Spatial System
From Sep to Dec 2020

SPATIAL
ROLE: User Research, Product thinking, UX/UI, 3D Modeling and Prototyping, Motion Graphics
MENTOR: Peter Ng
DURATION: Fall 2020
Spatial is a holographic collaboration platform that is building the next generation 3D platform and foundation for both AR and VR applications.
How might we create an end to end camera feature that allows people in Spatial to capture photos they like and easily film interesting videos, while sharing them at ease with their friends?

What was the problem?
For the past 3 months, I have been working as a holographic product design intern in Spatial. Despite having great passion for designing in the VR space, I have zero knowledge on 3D design. Kudos to my mentor and design guru Peter for helping me so much along this journey.
As Spatial scales its customer base to more than 1000 percent increase than the previous 2020 quarter after releasing the app in Oculus, we found that there are growing needs for customers to capture their own VR walkthrough in real time while documenting their meetings' highlights accessibly. At IBM, customers frequently requested meetings be more fluid in Spatial where users should be able to archive their work as their work or meeting sticky-notes evolved and even capture their own VR experiences in the office environment. This is a problem because Spatial do not support native in app screenshot feature and leaving the app to Oculus for capturing photos are both troublesome and take too many unnecessary steps.
The people problem is that
Spatial users want to have a streamlined screen capture experience with their VR headset but cannot because the current Spatial platform doesn't support and using native Oculus screen capture feature is time consuming and contains limited functionality.
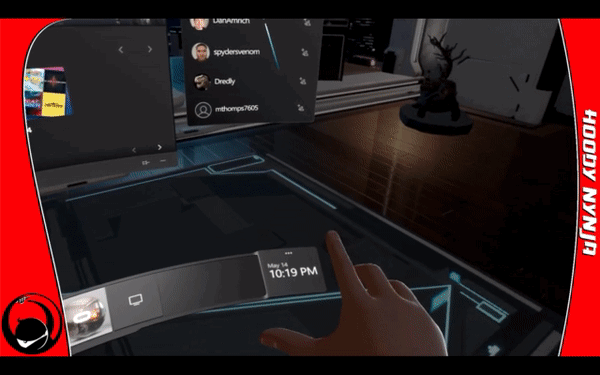
Screenshotting through Oculus native feature
DESIGN PROCESS
Market Research

Documentation on Figma on all the applications that have screenshot/video capture feature
KEY INSIGHTS
In looking at how different applications enabled the camera feature, I found that it was especially crucial to have zero latency during capture so that users could easily share them with friends (Iris VR), minimizing churn and vastly increasing the capability for capturing multiple photos in a short time frame. (Steam VR) In addition, using controllers as frame of capture was intuitive and versatile, easily mimicking a real-life selfie stick that was otherwise familiar with majority of the users. (Tilt Brush)
-
Using a camera capture frame attached to the controller provides more flexibility to the users on what to capture by easily moving their controllers at different distance
-
By using a controller as frame of reference, it models the view of a selfie stick, which is consistent with the current camera paradigm and requires less learning curve
-
Through direct manipulation of the controllers, users can effectively see their POV and capture things they like
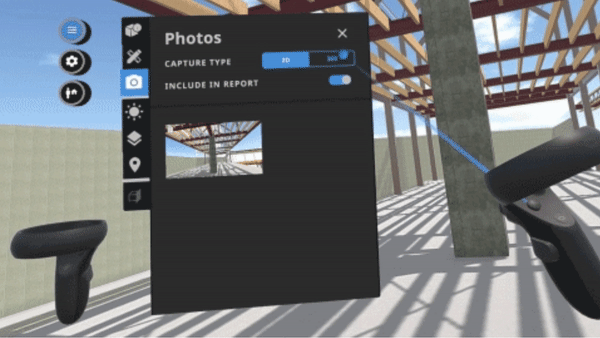
Using the Photo Capture to activate camera and capture the frame in scope
Since capturing photos and videos have not been a new concept in VR platforms and applications, I decided not to reinvent the wheel and instead did an extensive audit on what existing product had done in order to understand how it worked.
In sum, I looked into the UX flow, the degree of efficiency to capture photo and share with others and users' accessibility in order to gauge different pros and cons of the screen capture feature, serving as an inspiration for my own design.
SOLUTION EXPLORATIONS
Entry Point Explorations
In designing the camera feature, I explored 3 different variants to trigger the feature. The design decisions include 1) a variant that embed the feature in content controls, 2) a variant that enabled controller to trigger camera actions, and 3) making camera top level located in the main menu.


Making Capture within the more CTA button
Explorations and user flows in Figma
MOVING FORWARD
After an extensive discussion and design scrum with the cofounders and my designer manager, we decided to move forward with embedding the camera feature top level in the overflow setting menu.
CON
-
Invisible from main menu: User might need to take an extra step to enter from content menu, hidden from users, however, can be compensated by putting it in the top level overflow menu
-
Information Overload: Putting two many options may cognitively overload the users (Millar Law) and causes decision paralysis, can limit the number of buttons shown in overflow menu
PRO
-
Top Info: Pronounced CTA button at the top can draw visual attention and compensate for not existing in the content menu
-
Engineering Implementation: Adding the CTA in setting menu is less costly engineering wise than in the main content menu
-
Logical Discovery: Use Case at this level provides buttons that allows more customization and new feature of the Spatial application, which is consistent within this overflow menu

Content Menu

Overflow Menu
SOLUTION EXPLORATIONS
Camera Ideation
After determining the right entry point for the camera, I then started ideating with different possible forms of camera functions, ranging from using rectangular frame as screenshot capture filed, controllers to draw corners of frames, headset as POV (Point of View) to capture photo to using the controller to capture photos.

MOVING FORWARD
By prioritizing ease of use, familiarity, and technical feasibility, me and the team landed on two design variations that can best achieve the goal of capturing moments of the whole VR experience in real time.
The first one was a POV experience that enabled the users to capture their photos and videos with their headset. The second design was a handheld camera's experience that could be activated by the controller and utilized it to point and shoot at the view users like.
%20copy.png)
POV
Handheld Experience
By drawing out all the possible scenarios and user flows ranging from taking photos, selfie and recording videos, it helped me to envision the whole user journey and to uncover all the opportunities for users.
After a through communication with the design team, we decided to move forward with the handheld experiences since it provided a lot of flexibility for users to adjust their camera frame while the POV experience utilized the headset as the proxy for camera, which users might run into trouble moving their head to adjust the distance and size of the capture frame. In addition, users' mental model is most aligned with the handheld version of using their hands / controllers as camera since similar interaction paradigms have been used in most mobile phones.
.png)
Handheld

All the flows
Other States
.png)

Video Selected State
Multiple Photos State

Camera Unselected State

Confirmation State
.png)
Sharing Model

Prototyping
In prototyping in 3D Space, the biggest difficulty I faced was adjusting the right size in the XYZ coordinates in order to produce photorealistic prototypes that mimicked the actual camera function. With tremendous help and support from my rockstar manager Peter, I was able to start with some low fidelity and scrappy prototypes by putting dummies and gestures to get a sense of how to use cinema4D and familiarizing myself to prototype in 3D.

Rigged Hands and Movement

Low Fidelity Dummy

Camera Perspective Adjustments
Low Fidelity Camera Movement
High Fidelity Prototyping
After numerous iterations in the 3D space adjusting the angles and playing around with the coordinates, I then moved forward to put real life avatars in a boardroom space in order to capture the most realistic prototypes for review. For example, manipulating head movement were taken into consideration so that the POV experiences felt like you were wearing a headset.

Materials, Camera Perspective and Post Render Lighting
Selfie Camera with a POV Capture
Front Facing Camera with a POV Capture
Finalizing design specs
Near the end to handoff the design to engineers, I utilized After Effects to put the camera icons into the prototype. When I first started to prototype with After Effects, I had trouble differentiating whether to put those camera CTAs in the view attached to the object or attached to screen space. I started using motion tracking to attach icons above the object by using the 3D motion tracking feature. However, since the feature couldn't accurately trace the camera path, I had to annotate keyframes frame by frame in order to make sure the icons were in situ.
However, after soliciting feedback from my manager, I understood that the camera CTA buttons had to be fixed in screen space (2D) instead of world space (3D) since it was a common VR pattern. By placing it in screen space, it made sure the buttons are always visible to users at eye level and prevent the 2D buttons be misplaced in users' view.
After Effects Keyframing by hand
3D Motion Tracking
Shipping the feature
Handing off to engineers and actual implementaiton
After designing the feature at the end, I teamed up with another engineer AV Kim to implement and ship the product on the Oculus application. By familiarizing myself with scripting logic in C#, we were able to scope out the important specifications of the screenshot feature for Unity's implementation. In actual implementation, the original screenspace was too big that cluttered the context menu. So we decided to pivot to a smaller screen estate to allow enough negative space for positioning the context menu into the world space.
Another engineering constraint that we faced during the Unity hand-off was the design decision to share the photo with friends:
-
A. direct sharing is easiest for them who are willing to share it. Most of people most likely won’t do sharing it if there are extra steps. But first login process is kinda extra step in the beginning (But we do it for others e.g. slack integration already) and it feels a little forcing people to share it
-
B. just sending downloadable social share link on FB to you is less forcing and also possibly give you more options that you could do with once you download it but it introduces more extra steps which is not good
Since Option A requires storing user information on the SAPi as a token at the backend but might take considerable amount of engineering effort, the idea was abandoned. Instead, since users have already logged into the oculus app through Facebook, Option B seemed the most engineering feasible and faster UX flow to implement in Unity
Testing on Unity after implementation
Sideloading and testing on Oculus Apk

KEY LEARNINGS
Taking feedback concisely and with high clarity
One of the biggest obstacles I faced while designing the feature was not getting clarification on the feedback that I got. This caused a lot of going back and fourth and extra time consumption between the iterations and making a good prototype. By talking with my manager, I understood to ask a lot of clarifying and follow-up questions in order to truly understand every aspect and goal of the feedback in order to build the right prototype.
Be proactive and make orders out of choas
While starting the project initially, I was faced with a lot of ambiguity designing in the VR space since I have zero knowledge in the field. I didn't have any knowledge on the basic terms of 3D. I didn't have any knowledge about using Cinema 4D and using After Effects. This was compounded by the fact that the project was technically complex and required VR specific knowledge. When faced with so much ambiguity, I learnt to be elastic, having a growth mindset to believe that new things could be acquired, and to bring all the missing pieces together. In doing so, it gave me more motivation to drive initiatives to learn about the problem, understand the tools and ultimately solved the problem at hand.